Wednesday, January 30, 2008

Three-Cheese Enchiladas


Several people have asked for this recipe, so here it is:

THREE CHEESE ENCHILADAS

1 cup shredded monterey jack cheese, divided use
1 cup shredded cheddar cheese, divided use
3 ounces cream cheese, softened
1 cup salsa, divided use
1 medium bell pepper (any color), chopped
1/2 cup sliced green onions
1 teaspoon ground cumin
8 flour tortillas, 7 to 8 inch diameter
Garnishes if desired: chopped tomato, sliced black olives, shredded lettuce

Combine 3/4 cup of the shredded jack cheese, 3/4 cup of the shredded cheddar, cream cheese, 1/4 cup salsa, chopped bell pepper, green onions, and cumin. Mix well. Spoon about 1/4 cup (or a little less) of this mixture down the center of each tortilla. Roll up each filled tortilla and place, seam side down, in a well-greased 13x9x2-inch baking dish. Spoon the remaining 3/4 cup salsa evenly over the enchiladas; cover with remaining shredded cheeses. Bake at 350º for 20 minutes or until piping hot. If desired, garnish with any or all of the optional garnishes listed. Pass additional salsa if desired.

Yield: 4 servings

I love this recipe because it is so easy and is very tasty too.

Monday, January 28, 2008

Menu Plan Monday for January 28


How can it possibly be Monday again? Well, it is, so here is my plan for the week, with some repeat menus that we didn't use last week because of having lots of leftovers.

MONDAY: German Omelet, Green Beans, Tomato Aspic

TUESDAY: Spinach Tortellini Soup, Bread or Rolls

WEDNESDAY: Greek-Style Supper, Garlic-Sesame Pita Chips

THURSDAY: Three-Cheese Enchiladas, Broccoli-Cauliflower Blend

FRIDAY: Vegetable Chili, Cornbread

SATURDAY: Herbed Tomato Soup, Grilled Cheese & Walnut Sandwiches

SUNDAY: (potluck at church) White Chili, Cornbread, Coleslaw and a dessert as yet undetermined

If you would like to see menus that many others are planning for this week, go visit Laura at I'm an Organizing Junkie. Well over 100 people are taking part in Menu Plan Monday today!

Friday, January 25, 2008

Sew Crafty Friday for January 25


For Sew Crafty Friday this week, I just have a couple of things to share. I’m continuing to work on 2 more projects like I mentioned last week, but am not ready to post pictures of them on my blog since they are still top secret. And I’ve done a small amount of backstitching on my “Country Baking” sampler and a small amount of embroidery on a flour-sack towel.

As far as finished items this week, I only have completed two. First, I made a winter centerpiece. I was inspired by Kelli at There is No Place Like Home (kellishouse.blogspot.com). She came up with a lovely winter centerpiece, taking inspiration from the January page of a Marjolein Bastin calendar. I cannot take credit for the idea in any way, but I loved the idea of this centerpiece and found that I had everything on hand that I needed to make a similar one. Here it is:

And then the other thing I did was to make a “candle collar” -- another “Bits and Pieces” project from a gal on the Oh Christmas! craft forum. I have details on this project and a link to the forum/instructions on my Christmas blog, Mrs.T’s Christmas Kitchen (see link in sidebar) if you want to check it out. I just used bits and pieces I had on hand and also a candle I happened to have on hand. These bits & pieces projects are so much fun and use up craft leftovers and scraps at the same time. A win/win combination in my book! LJ is supposed to post another of these projects soon, and I can’t wait to see what it is.

So that is my craftiness for this week. What about you? If you’ve done any crafting this week, even if it’s still a work in progress, head on over to Waiting for Him and share your projects. It’s such fun and so inspiring to see what others are working on.

Show & Tell Friday for January 25


Today I would like to share for show & tell some of the favorite gifts I received for Christmas. First, here is an adorable sewing organizer made by my daughter Carrie. I love the colors! Carrie drew my name in a gift exchange we had with some other ladies. She was hoping that this new organizer would spur me into using my new sewing machine. However, I’m going to keep using the old one until I have finished 2 belated projects that are sort of rough on the machine. I’d rather keep using my old workhorse machine until those are done. But I love this organizer and have put it to work already.


Along with the organizer, and to match it, Carrie gave me this nifty sewing tin with its vintage Singer design.

Another favorite gift was this box of “ribbon candy” (actually ornaments) made by my daughter Joanna. I love the ornaments, but her creative packaging of them in a candy box is even more fun. This year I didn’t hang them on the tree, just displayed the “candy” in the box.

Joanna also gave me this jingle bell ornament which I love, with its retro colors and pretty snowflake design. What’s even neater is that she bought three of them -- one each for herself, Carrie, and me. So we can know that every Christmas we are all hanging the same ornament. It’s also special that she bought these at one of my favorite shops, Cherished Friends in Elko, NV.

Another very special gift is this ornament made by my granddaughter Sarah. It’s a glazed ceramic-type ornament with the imprint of a fir sprig in it. She made it in school -- she’s in first grade. The ornament is very nice, but to me the most special thing is that she wrapped it and labeled it and sneaked it under my tree all by herself. This is the first time one of my grandchildren has done that, and so it makes it very, very special to me. Along with the ornament was also a handmade card and a suncatcher she had made!

Finally, here is a favorite gift which has not been out of the package yet. Mr. T bought me this painting for dummies kit. I had hinted that I might welcome such a gift, and he remembered. I would love to learn to paint. I don’t suppose I have any talent, but I do long to learn to paint and to see if I can express what I’d like to through painting. So, we will see. It is just awaiting a little spare time on my part.

There are a few of my favorite gifts. Hope you have enjoyed the show & tell. To see what others have shared, visit There is No Place Like Home

and check out the links. Show & Tell Friday is a highlight of my week!

Monday, January 21, 2008

Menu Plan Monday for January 21


Another Monday! They just come around so quickly! It's a sunny morning here but very chilly. I'm thinking hearty dishes and lots of soups for the week ahead, plus some meals that didn't get used last week. Here's my plan:

MONDAY: Rosemary Chicken with White Beans and Carrots, Oatmeal Rolls

TUESDAY: German Omelet, Green Beans, Tomato Aspic

WEDNESDAY: Italian Wedding Soup, Oatmeal Rolls

THURSDAY: Chicken Divan, Mashed Potatoes, Brown-Sugar Carrots

FRIDAY: Kielbasa Bow Tie Skillet, Coleslaw

SATURDAY: Herbed Tomato Soup, Grilled Cheese Sandwiches

SUNDAY: Slow-cooked White Chili, Cornbread

Saturday, January 19, 2008

Basic Formula for Granola


I promised to post my basic formula for making granola. I’ve adapted this somewhat from the More With Less Cookbook, a Mennonite cookbook by Doris Janzen Longacre. I highly recommend this book. I believe it’s out of print, but it has many wonderful recipes and ideas for cooking frugally and healthfully.

BASIC FORMULA FOR GRANOLA

Preheat oven to 300º.

Combine in large bowl: 7 cups dry ingredients, including:

* At least 3 cups rolled oats
* Wheat germ
* Wheat bran or oat bran
* Cornmeal
* Grape-nuts or other cold cereal
* Uncooked hot cereals, like Ralston, Wheatena, etc.
* Sunflower seeds
* Roasted pumpkin seeds
* Shredded coconut
* Any chopped nuts, or whole peanuts
* Dry milk solids
* Spices like cinnamon or nutmeg

Combine separately: 1 cup liquids. including as desired:

* Canola oil or melted butter (I find about 1/2 cup works best)
* Honey
* Maple syrup
* Brown sugar (use 1/2 cup with 2 Tblsp water)
* Molasses
* Peanut butter
* Milk or cream

and 1 teaspoon vanilla.

(If desired, you may heat the liquids together until they are warm. A good idea when using some of the thicker items like peanut butter or molasses.)

Pour the combined liquids over the dry ingredients and stir to combine well. Spread mixture into a greased 13x9-inch pan and bake for 1 hour at 300º, stirring every 15 minutes.

Remove pan from oven; stir in, as desired:

* Raisins, either dark or golden
* Chopped dates
* Chopped dried apricots, dried apples, prunes, figs, etc.
* Dried cranberries or cherries
* Any other dried fruits you might like to use.

Cool the mixture before storing in an airtight container.

I have made countless batches of this granola over the years. My family loves it. I hope yours does, too.

Friday, January 18, 2008

Show & Tell Friday for January 18


Today for Show & Tell Friday, I am taking the easy way out and showing something I already had photos of. I must apologize in advance for the quality of the photos. The one of the blue quilt, in particular, I know is very fuzzy and unclear, but it’s the only photo I could find of that quilt.

These are quilts which my mother-in-law made for my two daughters as they left for college. It was a long time between her original thought of the idea and the actual finishing of the quilts. This idea came to her when my older daughter left for boarding school, but the quilt was not finished for several years after that. Basically, her thought was to have me cross-stitch a bunch of squares with things meaningful to my daughter -- favorite Scriptures, sayings, activities, etc. -- and then she would put them together into a quilt in the Attic Window pattern. So eventually, with the help of another friend who did some of the cross-stitching, the quilts were done. My mother-in-law has (if I recall correctly) at least 17 grandchildren and a bunch of great-grandchildren, but she has never made any other quilts like this. They were a lot of work. But the idea is lovely, and I thought others might like to see them and consider doing something similar for a loved one.

Here is the blue quilt -- the first one. I know that the details are very fuzzy, but you get the idea.

The rose quilt was the second (and last) one she did.

Here is a more close-up photo of some of the squares of the rose quilt.

On many of the squares, I started with a motif that I found in a book and then personalized it in some way. To show my daughter’s love of the ocean, for example, I did one with a seashell border and put a quote from John Masefield within the borders: “I must go down to the sea again, to the lonely sea and the sky.” On each quilt, I did a square for each of the 4 seasons. And I did squares with each of their siblings’ names, etc.

This was quite a stressful project because we were working with deadlines to get all of the squares and the quilts completed. But the result was truly a treasure in the end.

To see what others have shared for Show & Tell this week, head on over to There is No Place Like Home
. It's always fun to visit Kelli's house!

Favorite Ingredients Friday for January 18


I made some homemade granola yesterday -- something I used to do all the time, but had gotten away from. My husband had bought some granola last week and I happened to have some of it for breakfast one day. It was good, but it reminded me that I could easily make my own and save some money. I did, and it turned out so well! Right now I am just going to share the granola as I made it, but later I want to share the formula I use, which is so helpful when making this cereal. There really are endless variations to the basic formula. But here's the recipe for yesterday's

HOMEMADE GRANOLA

4 cups old-fashioned oats
1 cup flaked coconut
1 cup dry uncooked hot cereal (I used Hodgson Mill Multigrain Hot Cereal)
1/2 cup sunflower seeds
1/2 cup chopped almonds
1/2 cup nonfat dry milk
Cinnamon to taste
Nutmeg to taste
1/2 cup canola oil
1/2 cup brown sugar
2 Tblsp. water
1 tsp. vanilla
Chopped dates to taste
Raisins to taste

Preheat oven to 300º. In a large bowl, combine the oats, coconut, cereal, seeds, nuts, dry milk and spices.

In another bowl or a large measuring cup, combine the oil, brown sugar, water, and vanilla and mix well. Pour over the dry mixture and stir to combine thoroughly.

Transfer the mixture to a greased 13x9-inch pan and bake at 300º for 1 hour, stirring every 15 minutes.

Remove from oven; stir in dates and raisins, and let cool before storing. I store granola either in a plastic bag inside a recycled oatmeal canister, or in a large plastic container intended for cereal storage.

Tuesday, January 15, 2008

Tortilla Enchilada Soup


Someone asked for this recipe, which I had on the menu for last night. It is a super-easy crockpot meal, which is why I planned it for a Monday night.

TORTILLA ENCHILADA SOUP

4 cups chicken broth (I use 4 cups water and a teaspoon of chicken Better than Bouillon)
2 cans chicken with rice soup
1 small boneless skinless chicken breast (frozen is fine)
1 cup salsa or picante sauce
1 can red enchilada sauce

Flour tortillas
Shredded cheddar cheese OR cubes of velveeta-type cheese

In crock pot combine the broth, soup, chicken breast, salsa, and
enchilada sauce. Cook on low for about 4 hours. Remove chicken breast
from soup; shred it or cut in small pieces. Return to soup.
When ready to eat, cut flour tortillas into strips (scissors work best
for this). Put tortilla strips in each bowl and ladle the hot soup on
top. Top with shredded cheddar or cubed velveeta. About 6 servings.

This is another favorite in our “rotation” of crockpot meals. It is just delicious and soooo easy. Great with cornbread!

Homemade Italian Sausage


Sharon asked if I had a recipe for Italian sausage. I must admit that, though I frequently make my own breakfast sausage, I have never made Italian sausage. But having located this recipe, I’m going to try doing so. To find a recipe, I turned to a source that rarely fails me: Make Your Own Groceries, by Daphne Metaxas Hartwig. Sharon, if you can get your hands on a copy of this book (or its companion volume, More Make Your Own Groceries) I think it would be a cookbook you would enjoy owning. There is detailed information about making Italian sausage, breakfast sausages, kielbasa, bratwurst and chorizo... even tells you what cuts of meat to use, and how to make your own casings, etc. But I am going to simplify things here and just start with the ground pork and assume you want to make the bulk sausage with no casing. Here’s the recipe:

ITALIAN SAUSAGE

3 to 3 1/2 pounds ground pork
2 or 3 teaspoons fennel seed, crushed
2 to 4 garlic cloves, pressed or minced finely
1 Tblsp. salt
3/4 tsp. pepper

(For hot Italian sausage, add 1 to 2 teaspoons hot red pepper flakes, ground to a powder with a mortar & pestle or in a blender.

Knead the spices into the ground pork using your hands. Form into patties if desired; wrap well and let ripen in refrigerator 1 to 2 days before using. May be frozen for future use; if so, skip the ripening step.

Makes about 3 to 3 1/2 pounds Italian sausage.

You will probably notice, as I did, Sharon, that this recipe could be divided quite neatly by 3 if you wanted to try making only 1 pound to start with. I’m going to try this! If you try it, let me know what you think!

Monday, January 14, 2008

Snow day


I thought others might enjoy seeing what I am seeing today in this lovely snowstorm. I am not an expert photographer by any means and have not been able to capture the actual effect of the snow falling -- as I know Mr. T (and probably most other people) could easily do. However, I hope these photos will give you some idea of how beautiful the view is from my house today.

From my kitchen window

From a corner of the porch

Another from the porch -- look off to the left and you will see a misty sort of area -- that is snow just coming off some trees as a slight breeze came up.

This is what the screen door on our porch looks like with the snow sort of plastered against it.

From my sewing area

From the balcony off master bedroom

That’s all for now... enjoy.

About those cross-stitch samplers


Recently someone commented on the cross-stitched samplers I had shared on a Show & Tell Friday some weeks ago; I believe it was way back in November. The lady was interested in knowing what patterns I had used to stitch the samplers and if she could obtain them so that she might make some similar samplers of her own.

It occurred to me that others might be interested in having this information, so I went to my stash of Cross Country magazines and looked up the patterns I had used. The patterns are from Cross Country Stitching magazines. All of these back issues are still available. Here are the issues the samplers may be found in:

The Luke 6:38 sampler (titled "Good Measure" was in the June 1996 issue.

The Philippians 1:11 sampler (titled "Kitchen Wall") was in the February 1995 issue.

The Isaiah 1:18 sampler (titled "Scarlet & Crimson") was in the February 1996 issue. The one I have is wrongly labeled Feb. 1995, but it's definitely the 1996 issue.

As for the Colossians 4:5 sampler, it was in the October 2000 issue, and is (I think) titled "Teapots".

You can order any of these back issues from Cross Country Stitching via catalog or from their website. Here's the link: Cross Country Stitching.

Hope this information is helpful to someone and that you will have as much fun stitching these samplers as I did!

Menu Plan Monday for January 14


Another Monday! It's a snowy one here in New England. Here's my plan for the week:

MONDAY: Tortilla Enchilada Soup, Multigrain Bread

TUESDAY: Rosemary Chicken with White Beans

WEDNESDAY: Shrimp Monterey, Salad, Rolls

THURSDAY: Three-Cheese Enchiladas, Winter Blend Vegetables

FRIDAY: Kielbasa Bow Tie Skillet, Coleslaw

SATURDAY: Baked Fish Chowder, Oatmeal Bread

SUNDAY: Italian Wedding Soup, Oatmeal Bread

Saturday, January 12, 2008

When the path is steep...


Last year I bought on clearance, sight unseen, a calendar with the theme of “Pathways”. It featured lovely photographs of different roads, trails and paths all over the countryside. Along with each photograph was a quote concerning pathways. Some of the quotes were nice. Others I didn’t like as well, so I would write a Scripture verse I found more meaningful on a blank label and stick it over the quote.

Apparently I had never looked at the quote for January, since I got the calendar on a clearance sale and must not have hung it up until February. This past week I was making the calendar pages into envelopes, and happened upon this quote:

“When life’s path is steep,
keep your mind even.”

This is a quotation from the Roman poet Horace, who wrote before the time of Christ. I had never read this quote before, but it reminded me that when life’s path is steep, there is only one way to keep one’s mind even, and that is to keep it stayed upon God.

“Thou wilt keep him in perfect peace, whose mind is stayed on Thee: because he trusteth in Thee.
“Trust ye in the LORD for ever: for in the LORD JEHOVAH is everlasting strength.” (Isaiah 26:3-4)

“Blessed is the man that feareth the LORD, that delighteth greatly in His commandments...
“He shall not be afraid of evil tidings: his heart is fixed, trusting in the LORD.
“His heart is established, he shall not be afraid...” (Psalm 112:1, 7-8a)

Are you facing a steep path in this new year? Is your path steep today? The path I see ahead of me is steeper than I feel comfortable with. Truly, the only way to climb a steep path successfully is to stay one’s mind upon God. May He help us all to do just that when we face a steep path.

Friday, January 11, 2008

Sew Crafty Friday for January 11


For Sew Crafty Friday today, my crafts have a definite recycling twist to them -- a literal twist ( twist tie) in the case of the bows. I didn’t plan it this way, but as it happens, the only crafts I have finished this week are these from recycled materials.

I’ve been working on a rag quilt and it is about 1/3 done, so maybe next week I can share that. I’ve also been working on an embroidered flour-sack towel and on the backstitching of my cross-stitch “Country Baking” sampler.

But here is what I’ve finished:

These bows are made of all sorts of bits and pieces left over from Christmas wrapping and crafting. I found the instructions on the Oh Christmas! crafting forum. I am not going to try and post the link here, because whenever I try to put more than one link in a post, Blogger gives me fits by trying to combine the two links. I can eventually straighten it out, but it takes awhile. If you are interested in making some of these bows yourself, then go to my Christmas blog, Mrs. T’s Christmas Kitchen (link is in sidebar here) and you will find the link to the bow instructions.

The first two bows contain some vintage ribbon and trim from my grandmother’s stash (which I inherited) as well as some newer materials.

This blue and silver bow may be my favorite of the four that I’ve made so far.
I also made some envelopes out of old calendar pages. This is the time to take down those 2007 calendars and toss them, but I hate doing that if the pictures are really pretty. In past years I have used them in Sunday School classrooms, crafts, verse visuals, etc. but I really have all I need of those, so I turned these into envelopes. It’s easy and quick to do. Then I just stick a blank label on them where the address can be written. You can buy a special lick and stick glue to be used on envelopes, but I usually just seal mine with a glue stick or double stick tape.
That’s about it for my craftiness this week. What about you? If you have managed to accomplish or even start any crafting, then head on over to Waiting for Him and share your projects. Shereen and others will be eager to see what you have to share.

Happy Crafting!

Favorite Ingredients Friday for January 11


Today’s focus for Favorite Ingredients Friday is on Pies. We love pies! Pies are one of my favorite things to make. For today, I’ve chosen a recipe which I may have shared before, but it bears repeating. I thought it would be a good recipe to share in January, because it calls for simple pantry ingredients, not seasonal fruits.

REESE’S PIE

2 packages cook-and-serve type chocolate pudding
4 cups milk
1/2 cup creamy peanut butter
3/4 cup confectioners sugar
1 9-inch baked pie crust, cooled
1 to 1 1/2 cups whipping cream, whipped with 2 Tablespoons confectioners sugar and 1/2 teaspoon vanilla

In a large saucepan, combine the pudding mixes and milk. Cook and stir over medium heat until thickened and bubbly. Remove from heat and cool slightly.

Meanwhile, in a medium bowl, cut the peanut butter into the confectioners sugar until small crumbs form. Set aside about 2 Tablespoons of the crumbs -- put them in a custard cup or something. (It will be awhile before you use them.) Sprinkle all the rest of the crumbs into the bottom of the pie crust. Pour the pudding over the crumbs. Refrigerate the pie until the pudding is set. It will be cold. Spread the whipped cream over the top and sprinkle the reserved crumbs on top. Keep refrigerated until ready to serve.

Yield: 6 to 8 servings.

In our family, we call this “Reese’s Pie” because it reminds us of a pie by that name which we used to eat at a Vermont truck stop. I’m not sure, but I think the whipped cream on their pie had some cocoa added. It was chocolate, anyway. If you want to try that, whip in 3 or 4 Tablespoons of baking cocoa along with the sugar and vanilla; add 2 more Tablespoons confectioners sugar too since the cocoa is not sweetened.

Show & Tell Friday for January 11


For Show & Tell Friday today, I’m sharing a special treasure from my husband’s family. This marvelous crazy quilt was made by my husband’s great-grandmother many years ago. I really have no idea of exactly when it was made, but sometime in the late 1800s would be my best guess. It even has a title -- “Dreams of the Forest”. The fabric is mostly wool, perhaps all wool.

I’m afraid I may be bending a Show & Tell rule here, for this quilt is not actually in my possession at this time. It has, however, been in our home on numerous occasions to be shared with relatives who wished to look at it and photograph it. These photos were taken in 1979 on just such an occasion. All of us in the family consider that this quilt “belongs” to all of us, but we are hoping that eventually it will go to a museum where it can be properly stored and displayed for others to enjoy.

This picture shows the lefthand part of the quilt...

And this one shows the righthand part of the quilt...

And here is a picture showing a small part of the detail in the quilt. I think it is a truly amazing piece of work.

I thought this was too nice not to share. Hope it was OK to bend that rule, Kelli...

To see Show & Tell items shared by others, visit Kelli's blog, There is No Place Like Home.

Thursday, January 10, 2008

A weekly calendar page


If, like me, one of your goals for the new year is "getting organized", you might like to take a look at this weekly calendar page I made for myself.

I used to be a fairly unorganized person, though I have always longed to become more organized, especially in my household tasks and in my daily life.

For several years, I have used the pads of weekly calendar pages (these usually have magnets on the back to hold them on the fridge) to help me get organized. I would then "personalize" each week by noting down what sorts of things I needed to do on a particular day, and I also divided the activities of each week into categories. I got this idea of using categories from the Elizabeth George book A Woman's High Calling. It's really helpful, because looking at the different categories shows you at a glance what your priorities look like and if you lack balance in your life. I've had to tweak her list of categories a bit, because I needed to fit them into a small amount of space. My categories are these: Spiritual life; Home/family life; Ministry/social life; Health (both mental and physical).

This type of a schedule really helps in living out our goals on a daily basis. But one day, I ran out of pages on my weekly calendar pad, and I was unable to find more. Finally, the thought came to me: why not just design my own weekly calendar page in my word processing program? I could put in place many of the activities I do each day on a regular basis, saving myself the work of writing everything out each week. I just print out a few of these at a time, and I print on both sides, so I have 2 weeks' worth on one piece of paper.

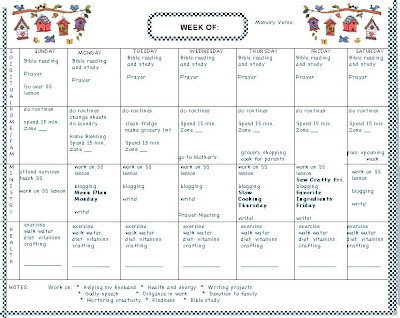
Let's look over my page. At the top is a place to put in the dates for the particular week. To the right of that, I've left a space to note the Scripture verse I am currently memorizing.

Next comes the spiritual life category. It doesn't vary much, as my quiet time is important each day. But on Sunday, I include reading over my Sunday School lesson and getting ready to teach it.

For the home/family category, I have left a space each day to note down what FlyLady zone I am working in on a particular week. FlyLady's routines have been SO helpful to me in getting my housework organized. I don't necessarily endorse everything and everyone that FlyLady does, but her routines are marvelous and work so well for me. I will add in on these squares anything else concerning home or family -- like "watch grandkids" or "birthday party", etc.

For the ministry/social category, it includes my church responsibilities as well as blogging and other writing ministries. I might add in things like "nursing home service" or "friends over for dinner" or "potluck at church" depending on what that week holds.

For the health category, since it includes mental as well as physical health, I include crafting along with the other health essentials. In this square I will also jot down doctor or dental appointments or list a particular craft project I want to work on.

At the bottom of each square in this category, I've left a small amount of space to jot down at least the main course of our main meal that day. This helps to keep my planned meals on my radar screen, so I don't forget to thaw meat, fill the slow cooker, etc.

And at the very bottom of the page, I've put a space for notes. There was a space like this on the weekly calendar pads I used to buy, and I found it a helpful place to list some specific, ongoing goals I'm working on. You might choose to use this space for something else, or not include it at all. If you left it out, you could use that space to list your menus or something else important.

Every Saturday evening, I try to turn to a new weekly calendar page and plan my upcoming week. It is very, very helpful to do this. Some weeks, I don't get this done until Sunday afternoon, but it's usually OK because my plans for Sunday seldom vary much.

And every morning, I take a "grocery list" size piece of paper (from a purchased pad) and write my daily schedule on it, referring to my weekly page to see what I need to do that particular day. I make a list of times, usually 7 am to 9:30 pm, in half-hour increments, and list what I will do when. Do I always follow this rigidly and exactly? No. But I do find it really, really helpful in prioritizing my goals for each day.

Well, I hope that this information has been helpful to someone. I know that scheduling has been an enormous help to me in using my time more wisely and effectively, so I am assuming it would help others, too. Feel free to borrow my chart and tweak it as much as you need to to make it work for you.

Monday, January 07, 2008

Menu Plan Monday for January 7


Another Monday! They seem to come around so quickly. Here is my tentative menu plan for this week:

MONDAY: Chicken Pot Pie, Squash, Cranberry Sauce

TUESDAY: Pepper Jack Chicken with Rice(leftover from Sunday), Romaine Salad, Dinner Rolls

WEDNESDAY: Veggie Meatball Soup, Multigrain Bread

THURSDAY: Vegetable Lasagna, Italian Bread

FRIDAY: Herbed Tomato Soup, Grilled Cheese Sandwiches

SATURDAY: Kielbasa Bow Tie Skillet, Coleslaw

SUNDAY: Tortilla Enchilada Soup, Cornbread

Friday, January 04, 2008

Sew Crafty Friday for January 4


I have missed being able to take part in Sew Crafty Friday, and have very little to share today, but wanted to post a little something.

These are some Christmas coasters which I made with the idea of using them in a gift exchange. I ended up not using them, so here will be the start of a nice gift for someone next year.

I made these using odds and ends of some of my favorite Christmas fabrics, and thought they came out very pretty.

This photo shows the back of one of the coasters. The backing fabric is the same on each of them. I absolutely love this vintage-looking material (I bought it a few years ago) with its birch-bark appearance.

This is all I have to share today, but if you’d like to see what others have been working on, or if you have some craftiness to share, do head on over to Waiting for Him and share your projects. Shereen and others will be eager to see what you have to share.

Happy Crafting!

Show & Tell Friday for January 4


For Show & Tell Friday today, I would like to share a wintry shelf display on my dining room hutch. This display will stay up all winter long (with the exception of the Christmas card box, which I’ve already removed) and it makes me smile every time I look at it. Here’s how the whole shelf looked at Christmastime:

I love that vintage card box, which I found in my parents’ attic.

It was really difficult to get a photo of this pop-up snow globe. I tried a couple of different times, but it still isn’t the best. The scene is Santa and his sleigh and reindeer flying over a village. These pop-up snow globes are the coolest things. A couple of different small bookstores in our area sell them. This year they had a nativity one, which I really liked, but for some reason it was three times the price of the others.


Here’s a glittery little house. I bought this in a set of 3 from Gooseberry Patch a number of years ago. I am really, really wanting to make some of these myself. I have directions, but haven’t tried yet. Maybe this year!

Here’s another house, along with a bottle brush tree (also from Gooseberry Patch). In back of the house is a Christmas cross-stitch I did a few years ago.

And here is a vintage white plastic reindeer along with another bottle brush tree. I love how the ornaments on this tree seem to glow as if they are really lights.

That is about all I have to share today. If you want to see what others have to share for Show & Tell Friday, head on over to There is No Place Like Home
and take a look.