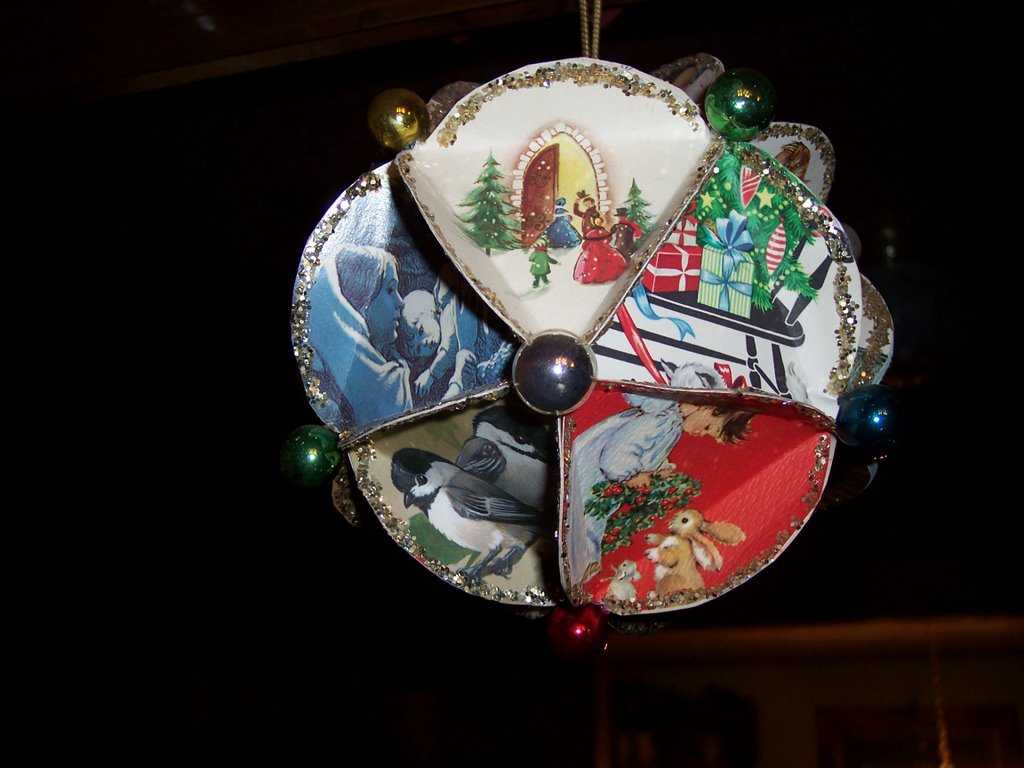
Wow, it is hard to believe we have gotten through 31 days of December. I hope that you've all enjoyed this little series of posts as much as I have. For the final one, I want to share another project from the archives ~ a colorful Christmas card ball. Many of my readers have seen this, but I imagine there are also many who have not. Years ago when I was a young mom, a friend of my mother's shared this craft idea with me. I have made many of these in the forty years or so since then. If you like, you could even make a non-Christmas decoration out of it -- just use wintry scenes and perhaps just silver and blue Christmas balls for trim along with glitter.

It's true that a kissing ball usually incorporates mistletoe or greens of some
sort. However, in our family we hang this colorful decoration made from
old Christmas cards in a doorway and we call it a "kissing ball". One
of the kids started calling it that, and the name stuck. My husband
persists in treating it as if it were mistletoe.
This project is a tiny bit time-consuming in waiting for glue to dry, etc. but it is very easy and a lot of fun to do.
You will need:
Old Christmas cards
A compass or a 3-inch jar lid (for tracing circles)
A pencil or pen
Ruler
Scissors
Mucilage-type glue (the kind with the spreader top)
Paper clips
Glue stick
Glitter
Miniature glass Christmas balls
Tacky glue
Heavy gold (or other) cord for hanging ball
To
begin, draw a three-inch circle or two on the back of a Christmas card,
and cut these out. These will be your templates. It's a good idea to
have more than one, because they get a bit worn down and out of shape if
you keep using the same template over and over. You need to also draw
an equilateral triangle that just fits inside a 3-inch circle, and cut
that out. This triangle will be your template for folding the circles
later.
Next, using your circle templates, draw 20 three-inch
circles on Christmas card fronts. Try and center the card's picture (or
the part of the picture you are using) in the circle. You may be able
to get more than one circle per card, depending upon the design. Cut
out the circles.
The next part sounds tricky, but it really isn't that difficult. Once you begin, you will understand how it works.
First,
make the
top of the ball. This takes 5 circles. Using your triangle
template, trace a triangle on the back of each circle, with the point
uppermost. You will want to make sure that your design is right side
up, with the triangle's point at the top. Now, fold along the lines you
just made. Crease them well. What you will have is a triangular
design framed by half-circle flaps on all three sides.
Now it's
time to glue. Take the first two circles and place them side by side
with the points of triangles next to each other at the top. Apply the
mucilage-type glue to the back of two adjacent side flaps and glue them
together. Secure with paper clips which will hold the flaps together
until they dry. Continue until all 5 pieces are glued together. Then
glue the two remaining side flaps together. You will see that this
forms a cap-like piece, or maybe an upside down bowl. Paper-clip the
last two glued flaps and set the piece aside to dry.
Next, make
the
bottom of the ball with 5 more circles. This time, trace your
triangle so that the point is at the bottom of your design. Again, be
sure the design is right side up, but with the triangle's point at the
bottom. Fold and crease as before.
Glue as for top, but this
time you glue them side by side with the points of triangles next to
each other at the bottom. Paper-clip the flaps together as you glue.
Finished bottom piece will resemble a bowl. Set aside to dry.
Now
make the
middle section, using the remaining 10 circles. This time you
will trace 5 triangles with the points up (design right side up) and 5
triangles with the points down (again, with the design right side up).
Fold and crease as before.
As you have probably guessed, the
positioning and gluing of the middle section is different from the top
and bottom. Place a point-up triangle next to a point-down one, and so
on, alternating between the two. Glue and clip adjacent flaps as you
go. At the end, glue and clip the remaining flap of the last piece to
the unglued side flap of the first piece. Set aside to dry.
(Are you thinking this is a lot of work? It's simple work, though, and I promise the finished product will be very pretty.)
When all three pieces are dry, remove all of the paper clips. Don't put them away, though -- you'll need them again.
Now,
glue the bottom flaps of your top piece to the top flaps of the middle
section, paper-clipping as you go. And then glue the top flaps of the
bottom piece to the bottom flaps of the middle section, again
paper-clipping as you go along. Set the completed ball aside to dry.
When
it's dry, now is the time to add glitter. (Remove all of the paper
clips before proceeding with this step.) You can use whatever color
glitter you like. I usually use gold or silver, but one time, for an
elderly aunt who collected Santas, I used all Santa cards for the ball
and used red glitter. Anyway, to add glitter, hold the ball over a
disposable pie pan or other throwaway container. Use the glue stick to
add glue to each flap of the completed ball, and then sprinkle the gluey
surface with glitter. Shake off excess.
Now, for the finishing
touch. You've probably noticed that there are openings where the
folded circles don't quite meet. You are about to fix that! For each
of these openings, dip the hanger end of a miniature Christmas ball in
tacky glue. Carefully insert these glued ends into each opening except
for the opening at the top of the ball.
Make a loop of cord to
use as a hanging loop. Tie the cord ends in a sturdy knot. Dip the
knot in tacky glue and carefully insert the knot into the opening at the
top of the ball.
Set the ball aside until all the glue is dry.

Hang your new decoration in a hallway, window, or from a ceiling fixture -- and enjoy its festive sparkle!
 |
| Although the ball doesn't show up really well in this picture, you can see how nice it looks in a doorway. |
* I should add that you can also make these smaller, by using 1 1/2-inch circles, and hang them on the Christmas tree. You wouldn't add the miniature ornaments to these, but probably just glitter. If you wanted to put something in the tiny spaces where the flaps meet, you could easily use beads. *