Showing posts with label handmade gifts. Show all posts

Thursday, January 12, 2023

This 'n' That


A vintage postcard from my collection

 This snowy January morning I just feel like sharing a few random thoughts.  I'm working on some special New Year posts (and also some end-of-the-year book talk) but they aren't ready yet.  Hence, a few minutes of this 'n' that.

January is a wonderful month for new starts and so yesterday I got everything together for a new cross-stitch project:  a January sampler from Prairie Schooler.  I got this pattern in 2021 along with the one for the February sampler one,  but started the February one first.  

 My plans are to stitch each of the patterns in this booklet.  I already started the tiny "Snow Day" one just because I think it is so cute and would make a fun addition to winter decorating.  Also, it will be super quick to make!

The February sampler has been finished for awhile and I've just washed it.  After it dries I plan to press and then finish it as I did December to use in the same way on a clipboard:

 I am not a fast or prolific cross-stitcher, but I do love it!

In other crafting news, I just finished some play food for our friends' children:

felt cheeseburgers like the one below  (I skipped the sesame seeds this time, feeling that these kids wouldn't go for them)

and crocheted donuts similar to those below (only I skipped the bead sprinkles thinking they might be unsafe in the hands of rambunctious little boys).  I did two strawberry frosted ones, two chocolate ones, and two white frosted chocolate ones.


Another project I never showed any photos of (except, I think, on Instagram) is some crocheted covers I made for wooden hangers:

I have one more to go, I think.

Does anyone else feel like doing little puttery things in January?  I think maybe a lot of us do, or possibly it's just me.  But I don't think so.

One little task I'm hoping to tackle today is to take all of my post-type earrings off a simple plastic canvas holder I made years ago.  

 
This holder is stuffed full of earrings by now and I literally can't find room for all my earrings on it.  The other day it struck me that if I just removed all of the earrings I no longer wear, there would be room and I would be as thrilled as I was back when I blogged about it in 2016.

So my plan is to remove all of the post-type earrings, clean them, and put them away.  Maybe eventually some of my granddaughters may want them.  I only wear dangle type earrings at this point, now that my hair is a lot longer than it used to be.  I honestly prefer them and don't see myself going back to the other type.

Another task (my hubby and I are working on this one together) is going through all of our food storage and taking inventory using this form:

We did this a couple years ago, but it needs doing again.  We weren't as good as we could have been about checking off the boxes when we removed something from storage.  We've gone through our main big pantry, but still have a couple other storage areas to do.  That's probably happening today since it's snowy outside.  Eventually we plan to inventory the freezer also.

I've also been going through books, mostly cookbooks, and being more ruthless about donating them.  I've got a "Making Space" box going with a variety of items in it that I'll be donating.  As I come across things -- a pillowcase, a pair of pants, boxes of Christmas cards, books -- that I'll never use again, into the box they go.  A Making Space post should be coming later this month.


 I don't think I ever posted about a new bedspread we got.  It was inexpensive but the color combination is something I've been wanting for a long time.  I love it!

 
And then there were some recent sunrise photos I never shared here.  Here are just a couple.  We don't often see pretty sunrises from our vantage point here in the woods.


Well, I'm sure I must have wasted enough time for today.  There is so much to do and I'd better get back at it.  What are you up to on this snowy day?


Saturday, January 15, 2022

Making a Christmas recipe book, part 2


 I promised to share a couple more ideas for making a special notebook or recipe book just for Christmas recipes.  It really is a great project to work on right after Christmas, when the recipes you used are fresh in your mind and probably still right at hand.  

 However, you could work on this project any time of year, as the spirit moves.  It might be fun to work on during July, for Christmas in July, or anytime in summer to help you feel a little cooler.  Not only is such a cookbook a great way to keep your Christmas recipes accessible; these things would make absolutely wonderful gifts as well, for grown children or for grandchildren.  (I did post about this project a few years ago over on my Christmas blog, so if it looks familiar to someone, that would be why.)

Making a photo book from Shutterfly turned out to be the perfect way to get all of our favorite Christmas cookie recipes in one easy place.  We make a lot of cookies every year, but we do tend to use the same recipes each Christmas, possibly adding in a few new ones.  

The standard 8x8 photo books have 20 pages, so I used 18 of them as recipe pages with a different cookie recipe on each page.  Some of the recipes are from my childhood; others are as new as Christmas 2018. 

On the first page I wrote out some of my Christmas baking memories from childhood.  I actually had written these out years ago for a Christmas memory book, so I just copied and pasted it into a text box on a page in the Shutterfly book.

Then I chose the 18 recipes that I wanted to use and dived into making the recipe pages.  I had photos for most of the cookie varieties.  Shutterfly absolutely walks you through the process of putting photo book pages together.  The recipe book format was a little different than an ordinary photo book because there were so many large text boxes to fill with recipes.  I added in a few of the charming Shutterfly "stickers" to embellish each page.  I didn't overdo it with these pretty touches (though one certainly could be tempted to do so) but just added enough to add color and charm to each page.

The screenshots of some of my pages, below, give you an idea as to what can be done.


Every time I get a free photo book offer, I'll make up another of these cookie books.  In that way I just pay shipping. To my mind, $7.99 is a fair price indeed for such a nice and useful product.  I've been able to give many of these as gifts.

Hope this has inspired someone to make a recipe photo book!  If you want more details as to how I did it, let me know and I'll try to help.


Thursday, December 30, 2021

A favorite gift from this Christmas


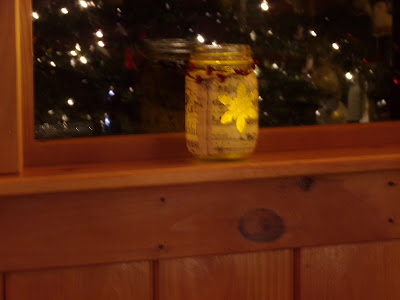
One of my favorite gifts this Christmas was made by two of my granddaughters (Julia - 15 and Arielle - 7) with a bit of help from their mom.  I guess you would call this a luminary, or maybe a candle jar.  Whatever you call it, it is pretty!

Photo at top is not the best picture as it was taken with a flash.  However, I do love the reflected tree lights in the photo.  I took another with my Kindle so will try adding that in also to give you a closer look.   Ah yes, this looks better.


I also took a couple Kindle photos in the daylight to show the details better.

The girls also made these for their music teachers (Julia) and Sunday School teacher (Arielle).  It looks as if they decoupaged sheet music, cut to size, and with a snowflake shape cut out of it,  to a pint mason jar with (probably) Mod Podge.  I haven't asked for the crafting particulars, but they did say that their mom cut the snowflake shapes out for them.  The sheet music is a Christmas carol, as you see: mine is O Come All Ye Faithful.  I think this was probably a sheet music printable, but am not sure.  It's lovely, anyway.  Then a simple jute tie around the top and some sweet red berry pips complete the project.  I love it!

Below is a little video of the jar with a flickering tea light inside.  It looks lovely with a real tea light candle (that's what it came with), but the one I used for the video was a battery operated tea light. 

 Isn't this a sweet project?


Saturday, December 04, 2021

How I adapted the "Christmas in a Can" idea


Detail from an embroidered table runner

 As I mentioned yesterday, I was really taken with that "Christmas in a can" idea -- packing a clean, unused paint can with all manner of Christmasy objects as a family gift. But I knew my own adaptation of it would need to involve a box or a large sack rather than a measly gallon can!

I really wanted to give my kids and grandkids some things that I had made, things they could bring out every Christmas season even after I’m gone, and say, “Mom (or Grammy) made these special things.” I also wanted to give these things to them near the end of November, so they could bring them out at the beginning of the Christmas season.  

I also wanted to add in special treats like popcorn, hot cocoa, Christmas napkins and more that they might not purchase for themselves.

So I actually did do this for a couple of years, though I can no longer remember which things I gave them in which years. But here are some of the things I’ve done:

* Handmade advent calendars


* Gooseberry Patch Christmas books


* Children’s hardcover Christmas books

* Christmas craft or idea books

* Microwave popcorn with handmade Christmas wrappers

* Packets of hot chocolate, with handmade Christmas wrappers

* Holiday teas


* Handmade Christmas fabric table runners
 
* Handmade ornaments
 
* Hand-crocheted personalized stockings
 

* Mr. T’s old work socks, embellished with holiday fabric patches and buttons
 
* Cross-stitched bread cloths and hand towels with Christmas motifs
 
* Personalized Christmas address labels (designed and printed by me)

* Cookie cutters

* Christmas paper napkins

... and more!

You could probably think of even more ideas that you could do that might suit your family.  Have fun with it!  

And if you like to make things, I encourage you to plan ahead for next year to craft some special Christmas items that will one day be heirlooms for your loved ones.

Friday, December 03, 2021

Christmas in a can


Yesterday I promised to share about my second favorite handmade gift that I've ever given.  So today, I'm going to share my original inspiration for this gift -- I wrote about it on my Christmas blog in 2007 -- and then tomorrow I will share how I adapted the idea.  I'm sure some of my readers will be interested in the first idea as well as the second, so that's why I'm including both.

Many years ago I came across this idea on a site I was visiting. I wanted to do this for my married kids and their families. It was several years before I actually got around to doing anything about it, and my results ended up being quite different from the original idea I had found, but thought others might enjoy hearing about this early Christmas gift anyway.

The original idea begins with a clean, unused, gallon paint can. You can cover the outside with Christmas themed kraft paper or any Christmas wrapping paper. You can make a label with clip art and a nice font that reads “Christmas in a Can” and add “Packed with care” or whatever else you like. You can make a similar label, only round, for the top of the can.

Then the can is packed with items to get a family in the Christmas spirit. Suggestions include:
 

* Microwave popcorn
* Wassail or spiced cider mix
* Hot chocolate mix
* Candy canes
* Cookie cutters
* Cookie mix
* Ornaments
* A short Christmas story or memory, printed in a neat font with clip art, folded in half and rolled up like a scroll.


For the microwave popcorn, you can make holiday wrappers that fold right around the packet of popcorn. Same with individual packets of hot chocolate or spiced cider mix. If using larger amounts of hot chocolate or a dry wassail mix, it was suggested to package 1 to 2 cups of these in the holiday printed plastic bags you can buy and staple a card stock label, with instructions, to the top.

Items in packets will obviously fit in the paint can a lot more easily than items in boxes or jars.

This site also suggested including a gingerbread cookie mix, which is simply a spice cake mix taken out of the box but left in its packet. Then you staple a card stock label to the top, with these instructions:

GINGERBREAD COOKIE MIX
Mix one medium egg, 2 Tblsp. water, and 1/4 cup soft shortening with cookie mix. Makes a stiff dough. Mix well, chill dough. Roll out on floured surface and cut with cookie cutters. Place on ungreased baking sheet. Bake at 375º for 8 to 10 minutes. Cool and decorate as desired.

You could probably think of other ideas. When you finish packing the can, place the lid on top and give to the family of your choice.

I thought this was a really neat idea for a family gift!  It would also be great to adapt for a college student or possibly even for someone in assisted living or a nursing home.   I hope someone else will have fun with this idea.

Monday, September 23, 2019

Making some apple coasters


Photo from Pixabay
Many, many years ago now when we first met our friends Dick and Terry, they had some apple shaped fabric coasters in their home, which I really admired.  I had seen similar ones in catalogs but hated to spend the money.  I borrowed one of Terry's coasters, took it home, and figured out how to make one.

I even made a pattern back then, but my first coaster turned out smaller than I liked, so I apparently drew around it to make a couple of larger ones. (And then kept the too-small pattern!  What was I thinking?)

Still, I was glad I had kept it, for late this summer when the impulse struck to make some more apple coasters, I was able to quickly find the pattern.  Using it for my first coaster in this batch made me realize it was really too small, so I did draw around it to make a larger leaf and apple.

I will spare you the wretched details of my first attempt using yellow homespun plaid for the apples -- my others had been homespun and I really liked the look, but in the process of trying to stitch the coasters I made an unbelievable amount of mistakes.  (And homespun is really unforgiving of mistakes.  It tends to shred if you try to pull out stitches.)

I will try and give a tutorial of sorts,  in case anyone else is in an apple coaster sort of mood.  You will need the apple pattern, fabrics and thread, cotton batting, and a sewing machine.  Oh, and an iron.

Here is the pattern I ended up with.  I think if you click on it, it will open up actual size.

Logically enough, you will need to cut 2 apple shapes and 2 leaf shapes for each coaster.  You could use red, green, or yellow fabrics for the apples.  The first ones I made were red and green.  Of course you will want some shade of green for the leaves.  You will also need to cut 1 apple shape out of cotton batting for each coaster.

Start by making a leaf.  Place the two fabric leaf pieces right sides together and sew around them using a 1/4-inch seam allowance, leaving the flat bottom area open and being sure to backstitch when you start and end your stitching.   Turn the leaf right side out and carefully poke out the seams to make a well shaped leaf.  Press the leaf flat with your iron.

You are going to pin the leaf in place between the 2 fabric apple shapes.  Keep the point of your leaf down and line up its flat raw edge with the raw edge of your apple pieces.  If you like, you can fold the bottom part of the leaf slightly before pinning to give it just a bit more dimension, as I did.  You can see that quite well on the coasters pictured below.

Next, place the batting apple shape on top of the fabric apple-leaf-fabric apple sandwich.  Pin everything together very securely.

Now you are going to stitch around the apple/leaf combination, using a 1/4 inch seam allowance.  Start on one side and stitch around, leaving about 2 inches open for turning, backstitching at beginning and end of stitching.  Trim your seam allowance to make it the apple smoother and easier to turn.  I left the seam allowance in place at the open area to make it simpler to tuck it in.

Turn your apple right side out, carefully smoothing the edges from the inside to ensure a nicely shaped apple.  Neatly tuck in the open part of the seam allowance and hand-sew the opening closed.*

Now top-stitch all around the apple (not the leaf)  close to the edge, to give a neat finish that will hold the batting in place.  It will also hold your hand-stitched opening securely closed.

* I tried to save time by just tucking in the seam allowance, pinning, and then doing the top-stitching step, as a means of closing the opening.  You can see in the photo below that this really didn't work out as well as I had hoped.  I've done this on bigger projects like hot mats or place mats, and it's been fine, but I think the hand-stitching the opening shut is really essential on a project this small, with a rounded seam.

There you have it!  An apple coaster!  Now make as many more apples as you would like.  Shades of red, yellow, green, or gold would all look nice.

I decided that the ones I made were too bright yellow, and I didn't really like the green I had chosen for the leaves, either.  (If only I had been able to salvage my homespun ones.  But I couldn't.)  So I picked a gold toile and a green calico for the ones I would be giving away.  I still wasn't thrilled with these, but liked them better than the brighter colors, and I wanted to get them on their way.

I kept the brighter yellow ones for our own use.  I mixed them in with our red and green homespun ones and they look fine.

Happy apple season! 

Tuesday, June 11, 2019

Like Grammy


I had many fun little blessings while our Nevada daughter and some of the children were here last month.  One very unexpected one came by way of something that Emily brought along.  You can see a scan of it above -- yes, one of those woven potholders that kids make using that classic square loom.  Just look at those vibrant colors and how carefully planned the design is.  This potholder is made with the nicer cotton jersey loops, not those rather flimsy ones that are nylon or something.  Emily brought this one for me, and one for Aunt Carrie.  Carrie's is in cooler shades of blue and green and is also very pretty.

But the most fun for me is the why of Emily bringing along these handmade potholders.  It was much more than just a thoughtful gift for her grandmother and aunt.

You see, the last few times we've visited Nevada, I've brought along a bunch of these crocheted scalloped potholders or hot mats to use as hostess gifts for people we stay with or families who invite us over for a meal.  This has worked out very well.  Sometimes my daughter has an idea as to the color of someone's kitchen or their favorite color, but pretty much every kitchen can utilize something like this for one purpose or another.
As I've said many times, these are so easy to make that I've memorized the pattern and can work on them in small increments of time.  (For those who may be interested in the pattern, you can find it here: Scalloped Potholder.    I will warn you, though,  that making these, trying out different color combinations with the cotton yarn, is somewhat addictive.)  Below are the two most recent I've completed:


But back to Emily.  When she handed out her handmade potholders to Carrie and me,  I was surprised and so blessed when Joanna explained, "She wanted to be like Grammy and bring potholders for a hostess gift."  So sweet!  I love it and just had to share that blessing with my readers!

Friday, January 04, 2019

Friday five for January 4


Gorgeous collage by Abby at Little Birdie Blessings
Here it is Friday again ... so I will share my first Friday five for this new year of 2019.  Here goes!

1.  A good group of friends and some family to help long-time friends of ours move into their new home here in New Hampshire, last Saturday.  It was good to see folks come together to help!
This delightful graphic is also by Little Birdie Blessings
2.  The opportunity to get together at my daughter's home with out-of-state extended family that we seldom see.  It was such an enjoyable time as we shared cocoa, clementines and Christmas cookies!
Playing "ride away to Boston" in tandem at the girls' request
3.  Opening our gifts from the Nevada family via Skype on Monday night.  My, my, what a creative group they are!  It was fun for them to be able to see our reactions!  The evergreen tree to the left of the Cat loader is made of grandchildren's hand prints.  The snow on the ground is fingerprints, and the snowman is a print of a 3-year-old's foot!

A photo is not going to do my apron justice, as it is decorated with dozens of tiny people, animals, and other creative figures all made from fingerprints with Sharpie details.  I think I am going to have to scan parts of it to really show how amazing it is.  It even has a title: "Grammy's Funprint Gallery".

4.  Two free offers from Shutterfly enabled me to make two photo calendars this week.  The new year found me with no new calendars!  (Well, there was that Caterpillar one, but ... actually, I did hang it in the kitchen for reference until the others arrive.)

5.  Two very long walks this week!  So thankful for roads that had mostly melted down to tar and for the stamina to climb hills.  We went a greater distance than we ever dreamed we could!

Image from CrossCards.com</a>
And that's it --  my Friday five for this week!